
Chandelier / Lámpara de araña


I don't dare call it a "tutorial" properly / No me atrevo a llamarle "tutorial" propiamente
I am trying to explain it easily. It is quite simple and easy (or I think so ) /Voy a intentar explicarlo de una manera facil Es muy simple y fácil (o eso creo )
I used these materials :
Metal sink drain filter , you find it in hardware stores .
Little golden jewelry chains from Stradivarius , Zara , etc.
Plastic syringe tube or any round tube a few millimeters wide .
Cristal beads with different sizes .I had some swaroski beads that fit nice.
Small hole metal grill.
Alpaca Silver threat of 0,25 mm .It cost 3.25 € plus shipping was 4.75 , total 8 €.But it is important because it has the proper hardness not like the others.
Clear glue
Grain of wheat bulbs with wire and one round bulb with wire as well.
Ending beads
Pliers of jewelry, scissor , clothespins.
Yo use estos materiales :
Un filtro metálico de desagüe de fregadero, en ferreterías .
Cadenitas doradas de bisutería en Stradivarius, Zara , etc
Un tubo de jeringuilla redondo (o cualquier tubo) de pocos milímetros de ancho.
Abalorios de cristal transparente de distintas tamaños .Yo tenia algunas de swaroski que quedan muy bien .
Rejilla metálica de agujero pequeñito.
Hilo de alpaca plata de 0,25 mm . Costó 3, 25 € pero el envío fue 4.75 , total 8€.Es importante porque otros no tienen la consistencia apropiada y no queda bien.
Pegamento transparente
Bombillas de grano de arroz con cable incorporado y una redonda con cable también .
Abalorios de terminación.
Alicates de joyería, tijeras , pinzas de tender .
But as I think an image is said to be worth than thousands words ..... You had better look at the photos
Pero como yo creo que una imagen vale mas que 1000 palabras ...... mejor mira las fotos


I tried with thin threat but it wasn't successful. / Lo intenté con hilo fino pero no salió bien.


Estos son algunos de los materiales / These are some of the materials
Al principio trabajé sobre una superficie semi-rigida que me permitía clavar si era necesario , estilo porexpan .
At first I worked on a semi-rigid surface that allowed me to nail if necessary , spandex foam style .

Hice un agujero en el centro superior del filtro del tamaño del tubo que tenia. Distribui el espacio proporcionalmente para 5 bombillas que quise poner .Marqué con palillos .Fui insertando los abalorios con la bombilla y pasando el cable por debajo .Asi hasta 5 bombillas.
I pierced in the middle on top of the drain filter , in the size of the tube I had. I shared out the space between 5 bulbs which I wanted to set in .I scored with tooth sticks.Them I was inserting the beads with the bulb and passing the wire underneath. Like this for the five bulbs.


Luego fui insertando cuentas en trozos de hilo metálico de la misma largura , ahora no me acuerdo pero es un poco más de lo más alto del filtro .Deje amplio margen para poder atar sin dificultad y si sobra pues se corta .Primero las cuentas mas grandes y en disminución de tamaño hacia arriba , como veis en la foto.
Then I was inserting beads into pieces of metallic thread of the same length, now I don't remember but it was a little bit higher than the length of the filter drain .I left margin to be able to tie without difficulty and if it is too much , then it is cut. First the big beads and then in decreasing size upwards , as you can see in the pic.
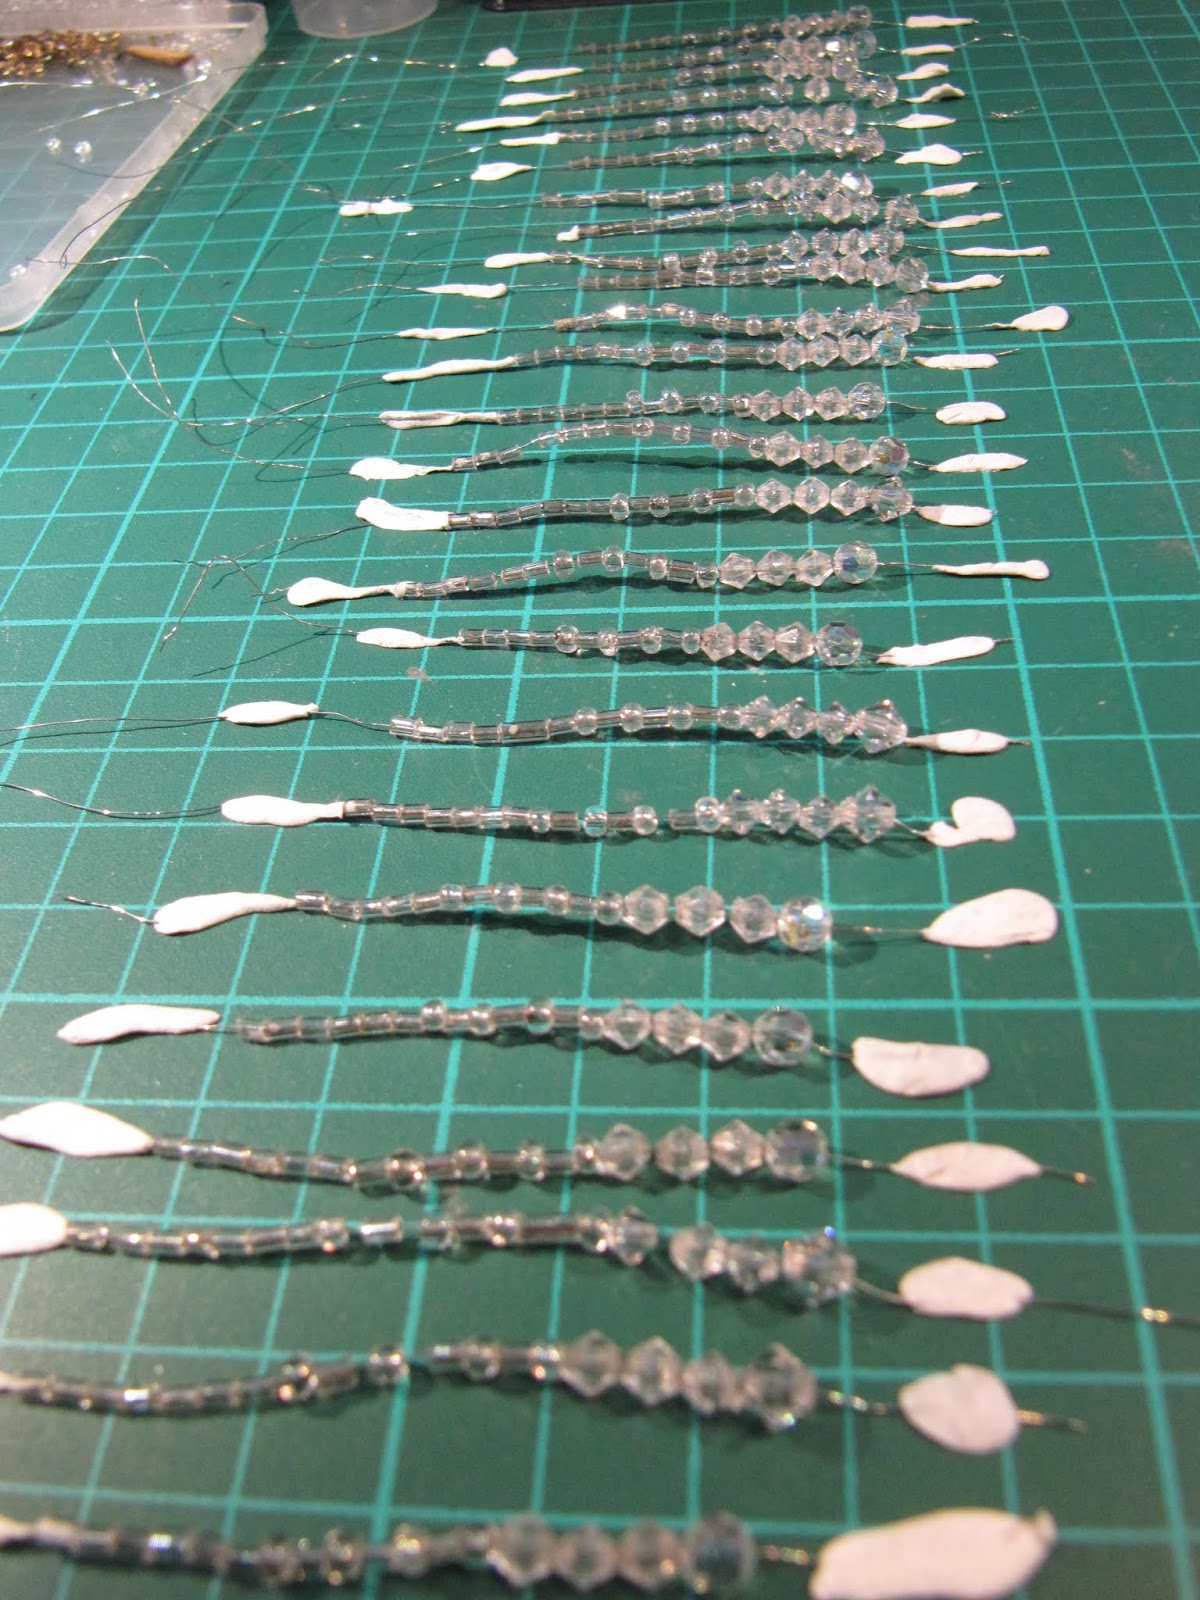
Conforme iba terminándo las hileras les colocaba gluetac en los extremos para que no se deshicieran , en la foto creo que salen unas 25.
As I was finishing the rows I put gluetac on the ends so they didn’t fall apart. I think there are about 25 in the picture.
As I was finishing the rows I put gluetac on the ends so they didn’t fall apart. I think there are about 25 in the picture.

Tenia compradas estas terminaciones doradas con gota de cristal, creo que son de Bindels Ornaments
I bought these golden terminations with drop of glass , I think they’re from Bindels Ornaments
I bought these golden terminations with drop of glass , I think they’re from Bindels Ornaments

Utilizé un tubo de jeringuilla y lo pinté de plata , lo corte a la medida .
I used a syringe tube and painted it silver , I cut it to size

A veces mientras hago una cosa se me ocurren otras .....
Sometimes while I’m doing one thing they come across other ....
Hay que reconocer que las fotos son malas ... pero muy malas , disculpad ! No tengo otras !
You have to recognize that the photos are bad ... but very bad , excuse me ! I don’t have other !

Pase el tubo por el centro del filtro y fui pasando los cables de las bombillas por debajo , por el interior y por el tubo gris plateado para que no se vieran tanto.
Los cables eléctricos van por dentro del tubo y los metálicos por fuera.
I passed the tube through the center of the filter and I went through the wires of the bulbs underneath , inside and through the silver gray tube so that they would not be seen as much.
The electric wires go through the plastic tube and the metal ones go outside .


Así va tomando forma ;
Como veis puse un abalorio de terminación de collares arriba .Lo compre en una tienda de abalorios .Lo elegí a propósito con el agujero un poco más grande para poder pasar todos los cables : los de las hileras y los eléctricos .
Como veis puse un abalorio de terminación de collares arriba .Lo compre en una tienda de abalorios .Lo elegí a propósito con el agujero un poco más grande para poder pasar todos los cables : los de las hileras y los eléctricos .
Thus it takes shape ;
As you can see I put a necklaces termination bead up. I bought it at a bead shop.I chose it on purpose because it had a big hole to pass throuhgt all the wires and rows .

Como estos ,pero estos no tienen el agujero ancho / Like these ones but they don't have the hole wide enough .

Foto del interior / Picture of the inside
Segunda parte / Second part
Segunda parte / Second part
Hay que hacer la parte de abajo.Para ello utilicé un recorte de rejilla metálica porque tenia muchos agujeros para poder pasar cables promediados que es lo que yo buscaba siempre para poder hacer estas lamparas...
Ataba las hileras por abajo para que no se vieran tanto.La rejilla en ferreterías.
Now you have to do the bottom.I used a part of metal grill so it had many little holes to pass rows and wires through .I was always looking for materials like this to make chandeliers ...
I tied the rows down so they wouldn't see so much.I found the grill in hardware shops
Now you have to do the bottom.I used a part of metal grill so it had many little holes to pass rows and wires through .I was always looking for materials like this to make chandeliers ...
I tied the rows down so they wouldn't see so much.I found the grill in hardware shops

El circulo de plastico solo es para darle forma a la rejilla pues media lo mismo que necesitaba , después lo quite .


When I finished the circle with the beads I glued it to the metal ring of the filter drain.
Luego puse las cadenitas alrededor para tapar los hilos y para adornar .Puse una bombilla mas grande redonda en el centro , como las otras el cable fue hacia arriba .
Coloque un abalorio de terminación al que le añadí una pieza de cristal antigua que tenia y que es muy bonita .
Then I put the little chains around to cover the threads and to adorn.I put a bigger round bulb in the center, like the others the wire went up.I placed a finishing bead to which I added an antique piece of glass that I had and which is very pretty.
Y más o menos ...... así quedó ! / And more or less ...... so it was !
Visiblemente mejorable , creo que lo sabréis hacer mejor, esto solo es una idea .....
Very improvable, I think you’ll make it better, this is just an idea ....

Me doy cuenta de que no he dicho nada de la conexión eléctrica , dando por hecho que todo el mundo la sabe hacer.... Una vez todos los cables están pasados por arriba separamos de cada bombilla los dos que vienen juntos y cogemos uno de cada una por un lado y los otros por el otro de tal manera que los unifiquemos en solo dos grupos .Los pelamos por la punta para tener un trocito de cobre de cada uno y los enrollamos hasta que quede como uno solo , repetimos lo mismo con el otro bloque .Asi nos quedan solo dos cables de cobre , eso si : gruesos.Ya los podemos empalmar al cable que irá a la fuente eléctrica o enchufe .

Así iba quedando , en la parte de arriba coloque otra terminación para tapar el agujero del techo y unos abalorios colgando de la opuesta hacia abajo , iguales a los del circulo de abajo.
So that is how it looked like , on the top I placed another termination to plug the hole in the ceiling and some beads hanging from the opposite down, the same as those in the circle below.

Ah!, yo utilizo este artilugio de colgar fotos para trabajar mis lamparas lo que me permite ponerlas bocabajo, ya veis .
Ah ! , I use this "tool" to hang photos to work ,that allow me to put them upside-down , as you can see .
Ah ! , I use this "tool" to hang photos to work ,that allow me to put them upside-down , as you can see .

Bueno por lo menos, lucir, luce , verdad ?
At least , it shines, right?
At least , it shines, right?
Que trabajazo!!! Te ha quedado maravillosa. Enhorabuena
ResponderEliminarEste comentario ha sido eliminado por el autor.
EliminarMuchas gracias amiga de las minis !!!! bus
EliminarThank you for this wonderfully explained tutorial. Your chandelier is stunning!
ResponderEliminarHugs, Drora
Thank you very much.It is very kind of you.
EliminarUn lujo de lámpara, gracias por el tutorial. Encendida y puesta en su lugar se ve divina!!! Nada que envidiar a las que venden por muuucho dinero.😍
ResponderEliminarMuchas gracias , tus trabajos si que son divinos , Bss
ResponderEliminarun tutorial super clarisimo. Hasta parece sencillo hacerlo, pero de momento no seré yo quien me atreva. Una autentica preciosidad. enhorabuena
ResponderEliminarMuchísimas gracias !!!! Que amable !!!!
EliminarWow.. súper.. fantástico tutorial , te quedo estupenda!!
ResponderEliminarQue bien que te guste , muchísimas gracias !
ResponderEliminarEs una preciosidad! Llena de encanto, además. El efecto sobre la habitación es espectacular. No sé si me atrevería a intentarlo, pero es una de esas piezas de amor a primera vista. Me rechifla! ♥
ResponderEliminarMuchísimas gracias amiga de las minis ! Que amable !!! Besos
EliminarTe ha quedado preciosa, iluminada es perfecta con ese aíre cálido que le da a la habitación!
ResponderEliminarGracias por el tutorial.
Besos.
Muchísimas gracias ! Tu si que haces cosas preciosas...Besos
EliminarUna maravilla de lámpara y un estupendo tutorial
ResponderEliminarMuchísimas gracias, eres muy amable!!!! Besos
EliminarDivina de bella, que candelabro tan espectacular!!! Muchisimas gracias por compartir. Eres talento y crearividad pura!!! Desde Mexico mis respetos para todas tus creaciones!!!!
ResponderEliminarGracias a ti !!! Adoro México y su gente !!!!!!😍😍😍
ResponderEliminar